Spring Security 개요
해결하려는 문제
웹사이트의 보안
웹 사이트에는 여러 서비스를 배포하기 위한 리소스와, 이를 사용하는 유저들의 정보가 담겨있습니다.
악의적인 접근으로 부터 이 리소스를 보호하기 위해 Security Library가 사용됩니다.
인증 (Authentication)
모든 사용자에게 열려있는 페이지도 있지만, 특정 리소스에 접근하거나, private 사용을 보장하기 위해 일반적으로 Login 하는 과정이 필요합니다.
Login은 기존에 ID와 Password를 입력하여 로그인하였으나, 최근에 생긴 페이지들에서는 KAKAO, NAVER 등을 통해 인증을 대리하는 추세입니다.
Login 후 인증을 기존에는 Session으로 관리하였으나, 최근에는 서비스가 확장되며 서버들을 scale-out을 해나가면서
session을 분산해서 저장하고, 동기화가 필요해졌습니다.
이를 보완하기 위해 session-less의 token 관리 방식으로 인증을 하기 시작하고 있습니다.
권한, 인가 (Authorization)
Login을 완료한 후에 이 사용자가 가진 권한으로 어떤 일을 할 수 있는지 설정합니다. 크게는 관리자(ADMIN), 사용자(USER)로 권한을 설정합니다.
웹 서비스를 개발할 때에 권한이 있는 사용자만 특정 uri, 리소스에 접근할 수 있도록 하여야합니다.
이는 Spring Security Framework을 통해 보다 쉽게 구현할 수 있습니다.
비즈니스 로직이 복잡해지고, annotaion으로 체크하는 것이 어려워지면 AOP 등 다양한 방법을 사용한다. 권한을 다루는 방법은 무수히 많습니다.
예제 코드
aaplication.yml
Login과 권한 테스트를 위해 yml파일에 user 1명을 생성해주었습니다.
1 | spring: |
Controller
index : uri를 /로 설정하고, “홈페이지”라는 String을 return 해주는 페이지
/auth : SecurityContextHolder를 통해 사용자의 권한 등 세부 사항을 return 해주는 페이지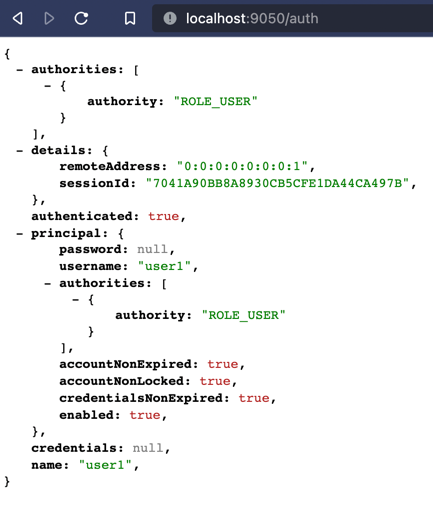
1 |
|
@PreAuthorize 어노테이션을 사용하여 특정 권한을 가진 사람만 접근 허용
SecurityMessage라는 POJO를 만들어 Authentication과 String 타입을 갖는 변수들을 선언해주었습니다.
SecurityMessage 코드 보기
1 | import lombok.Builder; |
/user 에는 USER라는 권한(ROLE)을 가진 사람, /admin에는 ADMIN 권한을 가진 사람만 접근할 수 있도록 해주었습니다.
아직까지는 application.yml에서 설정한 user의 roles는 USER이지만 /admin에도 접근이 가능합니다.
@PreAuthorize(“hasZnyAuthority(‘ROLE’)”) 을 활성화 시켜주기 위해서는 WebSecurityConfigurerAdapter 클래스를 extends한 클래스가 존재해야하고, 추가로 annotation을 설정해주어야 합니다..
1 | /*...*/ |
Config Class
1. @PreAuthorize를 활성화시키기 위해 SecurityConfig라는 클래스를 만들어 WebSecurityConfigurerAdapter를 extends 해주었습니다.
2. @EnableWebSecurity(debug = true) : default 값은 false이지만 security를 debug로 실행시키기 위해 추가하였습니다.
3. @EnableGlobalMethodSecurity(prePostEnabled = true) : prePostEnabled를 true로 설정하였습니다.
1 |
|
위와 같이 활성화를 시키면 USER 권한을 가진 사용자가 /admin에 접근할 때 아래와 같이 403에러가 발생한다.

접근 테스트를 위해 WebSecurityConfigurerAdapter 를 extends한 클래스 내에서 user를 생성하여 테스트 할 수 있다.
User Test
WebSecurityConfigurerAdapter는 configure(AuthenticationManagerBuilder auth) 메서드를 가지고 있는데, parameter에서도 알 수 있듯이 AuthenticationManager를 Build하여 생성할 수 있다.
configure(AuthenticationManagerBuilder auth) 메서드를 override하게 되면 application.yml에서 설정한 user는 사용할 수 없다.
아래 코드를 통해 inMemoryAuthentication 방식으로 user 2명을 생성하였다.
이 때 유의할 점은 password를 등록할 때 암호화를 해주어야 한다는 것이다.
아직까지는 ADMIN 권한을 가진 user는 /admin에만, USER 권한은 /user에만 접근할 수 있다.
1 |
|
누구나 접근할 수 있는 페이지
권한에 상관없이 누구나 접근할 수 있는 페이지도 configure(HttpSecurity http) 메서드로 설정할 수 있다.
index 페이지인 /를 누구나 접근할 수 있도록 설정하였다.
request를 받아, / 에 접근하는 요청에 대해 permitAll()을 통해 누구나 접근할 수 있도록 설정할 수 있다.
1 |
|
Spring Security 개요
install_url to use ShareThis. Please set it in _config.yml.